Pages

Monday, 19 November 2012

Crispy Chilli Chicken


Without a doubt this is the dish I am most proud of making. It's also my girlfriend's favourite, so I love cooking this for us on a night in. It's amazingly comforting, fairly simple to do, and absolutely delicious.

It's also far better than any Chinese takeaway dish I've had, and I'm not afraid to say it.

This is the second part of my authentic Chinese takeaway dish, and should be served with the egg fried rice I made previously.

You'll need:
Chicken breasts
4 large eggs
Cornflour
Carrots
Chili
Spring onions
1 garlic clove
Fresh ginger
A lime
Soy sauce
Sweet chilli sauce
Toasted sesame oil
A bottle of vegetable oil (for frying)


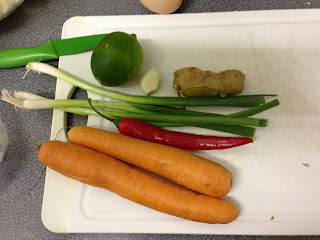
Start by chopping the veg. The theme we're going with here is strips. Everything needs to be cut into strips. OK, not everything, but pretty much all of it. This part can get very time consuming. Be careful when cutting as you'll be cutting close to the hand.

Slice the carrots (use one per person) into thin sticks, as I have done below.


Next, prepare the spring onions. Cut these up finely.


The ginger needs to be cut into matchsticks. Take around two inches of ginger, cut off the outside layer, and cut down into thin strips. Then, cut each strip into thin matchsticks.


Cut down the middle of the chilli, and remove the seeds. You can keep these in if you like, but you're looking at a serious kick if you do. If you'd prefer to keep them in, by all means do, but I prefer them removed.

Once you've removed the seeds, chop into slices.


Next, slice the garlic clove up. keep it sliced, rather than going for crushing.


Pour a bottle of vegetable oil into a large pot, and place this on a mid-high heat.

Use extreme caution from here on out. Hot oil is dangerous, and burns are excruciatingly painful. Oil fires aren't a lot of fun either. Be careful. 


While the oil is heating, use a sharp knife to cut the chicken. Again, this needs to be cut into thin strips.


I did actually buy too much, but I'm going to commit and cook this anyway. I'm cooking the whole lot and then I've got some saved for the following day. This could also be frozen and saved for a rainy day. There's a lot of them in the UK, after all.


When you've done this, crack some eggs into a bowl. I've stated on here to use four large eggs. When I went shopping, the only ones available were medium, so I've used six here.


Use a fork or whisk to beat the eggs.


Once beaten, add three tablespoons of cornflour, and beat with a fork.


This will create a thick batter. If you want it thicker, which is a good idea as it needs to coat the chicken, add another spoonful and whisk in.


Once you've got the consistency you want, drizzle in some soy sauce, and whisk again.


You'll be left with something that looks like this. Add the chicken pieces in, and use your hands to mix everything in together, making sure that the chicken is completely coated in the batter.


At this stage, it's time to cook the chicken. Remember - use extreme caution here. Use a metal utensil to carefully lower the battered chicken into the hot oil. When all the chicken has been added, let this cook away. By the time you need it, it'll be cooked through.


At this stage I'd actually give everything a quick wash. It's all pretty intense from here so while the chicken is cooking, wash stuff up. The chicken needs to cook anyway, so the the washing out of the way.

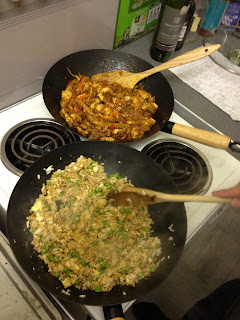
When you're ready, grab two woks. One is for the egg fried rice from the previous post, the other is for putting this dish together.

Start by pouring some oil into the wok, this is the kind I prefer.


Cook the garlic slices first. They need to be toasted in the oil, so let them cook until they're golden brown. This will give them a nutty flavour, and will give the dish a lovely undertone.


Once the garlic has been toasted, add the rest of the veg to the wok, and stir fry in the oil you've cooked the garlic in. This will then spread the flavour of the garlic to the rest of the veg.


Keep this veg moving for a couple of minutes, stir frying it.


Next, add some sweet chilli sauce. You'll need a pretty hefty bottle for this dish.


We're not even finished with it yet...


Add all the chicken, just be careful whilst doing so. Once you've added the chicken, reduce the heat to a medium level.


Give this a good mix, and carry on adding as I have done in the pictures above.

Once you've added all the chicken, pour in some more sweet chilli sauce.


Keep this moving, and add more sauce if you need to. Don't add all of it at once as you won't need it all, and you don't want to drown it completely. You're just after an even coating over the chicken.


When you've finished adding the sauce, give it another stir to stop it from burning. Give it a taste, and see what you think.

Finally, add the juice of half a lime, and mix in again. This will completely transform the flavour, enhancing everything.


That's it! That's my authentic Chinese takeaway style dish, crispy chilli chicken with egg fried rice.

Enjoy guys! This one's my pride and joy.


Egg Fried Rice

Now pretty much everyone I know loves a good Chinese takeaway. And pretty much every Chinese takeaway lover I know loves a good helping of egg fried rice.

It's once of those foods that is always tasty, really filling and fantastically satisfying. It can also be eaten with a variety of foods.

This is the first of a two-part post to show you how to make my favourite Chinese takeaway dish. From scratch.

Now before you start, keep this in mind. Egg fried rice is made with rice that has been cooked, and left in a fridge over night. It's a quick meal to make, but keep in mind that you'll have to start the day before.

Most of this recipe has been directly taken from one Gok Wan did, featured on his cookery show.

You can find his original recipe here, but I'll give you the fully photographed version.

Start by pouring the desired amount of rice into a stock pot. You need to have a pot with a tight-fitting lid. As for measuring the rice, I normally do two handfuls per person. If this makes more than is needed, it just means you've got some left over.

You'll need:
Rice
Eggs
Peas
Toasted sesame/groundnut oil
Soy sauce
Fish sauce


Fill the stock pot with water. You'll need quite a lot for this stage.


You see how the water is quite cloudy at the moment? That's because it's full of starch from the rice. We want to get rid of this. What we'll be left with is a fluffier rice grain once cooked that won't stick to the pan, or the other grains as much.

You can do this by rubbing the grains between your hands in the water. When the water becomes really cloudy, drain it and repeat the process.


Do this three or four times until the water is clear.


Drain the rice again, and flatten down with your fingers, as demonstrated below.


Here's a cool trick I learned from Gok's TV show - It doesn't matter what size your pan is, or how much rice you've got, the water level needs to be 2cm above the rice in the pan. There's an easy way of testing this.


As it turns out, the first knuckle crease in your middle finger (assuming you're an adult) should be about 2cm from your fingertip. So politely flip your stockpot the bird and do what you can to make sure the water level is no higher or lower than 2cm.


Once the rice has been washed, and you've got enough water in the pan, place it on a hot hob.


You need to bring the water to the boil. This can take around 15 minutes. Once it's boiling, keep it on a high heat and keep it bubbling.


This needs to boil away until bubbles form on the surface on the rice. This has been pretty difficult to photograph due to the amount of steam, but you'll see what I mean.


           Hopefully that's a better picture! Once bubbles are on the surface of the rice, whack the pot's lid on, and reduce the heat to a low simmer.


Leave this to work for 10 minutes.

As Gok Wan said - Foolproof Rice!


Remove the lid from the pan after 10 minutes, let the steam escape and take a look. If it needs a little longer, raise the heat ever so slightly and keep the rice moving with a wooden spoon until there is less water in there.

Remove the heat. Fluff the rice with the spoon and let it steam dry.


What you'll be left with is just plain rice, but the texture will be lovely, and it's good enough to eat with anything you want on it. But we've still got to turn this into egg fried rice.

Stick the rice in a bowl, and keep in the fridge until you need it. Okay, it doesn't have to be overnight, but I'd keep it in there for a minimum of four hours. The longer the better, though, to be honest. This gives the rice time to dry, and will fry much better this way.


So the rice has dried out in the fridge, it's time to turn this into a takeaway classic.

Start by pouring some oil into a wok. Ideally a nutty oil, such as groundnut, or my preference, toasted sesame oil. This is perfect for Chinese cooking.


The rest of this dish requires very quick work. Please keep this in mind, and read through this post a few times to get an idea of what needs to be done.

Heat the oil in the wok. Grab some eggs, for two people, use three eggs. For three, use five, for four people use six if you can.


Crack the eggs into the hot wok and scramble them with a wooden spoon or spatula.


Keeping up with the quick work here, scoop as much rice as you need into the wok. You want to do this before the eggs cook through. This will mean that the eggs will slightly coat some of the rice.


Give this a good mix around with your preferred utensil. Add a little more oil if you need it, but try not to add too much, you don't want oily egg fried rice.


Keep the rice moving, you don't want it to burn, but you do want it to cook all the way through.

At this point you can add the classic ingredient to go with this - a generous helping of peas


Give this a good mix in too, and keep moving it in a stir-fry style.


At this stage we can start adding flavours to it. Drizzle in some soy sauce, and about two teaspoons of fish sauce. This will give this a Chinese flavour.


Give this another stir fry, keep it moving.


Give it a taste, and see if you're happy with the flavours. If not, add what you feel is appropriate, and if it tastes absolutely perfect, serve it up!

This will go amazingly with the other authentic Chinese dish that I'm posting on this blog, to find out how to make it, click here.